
Performance testing on a blue-collar budget
If you’ve been in the sports industry for long, either as a coach or an athlete, you’ve probably heard the phrase “we don’t have the money for that” all too often!
It’s often used against requests for more or better staff, better pay, additional resources, and/or acquiring newer technology.
Side Note: if we were placing 1) the health and value of athletes and 2) optimizing for the very best performance ahead of the business of sport, many of those things would (and should) be prioritized in the budget!
However, just because we can’t afford better or more efficient systems and equipment DOES NOT mean we can’t maximize and innovate with what we have!
Performance testing is very close to my heart.
In large part, this infatuation undoubtedly came from my time spent in the academic research world and years of work in sports with teams.
But I love a good test-retest!
If you don’t test before and after you’ve changed or tried to improve something, how do you actually know if you’ve improved it?
As I too am often strapped with a budget, whether by an organisation (shoutout to clubs and colleges!), a facility, or by my own bank account, I invented a Budget Test Battery for my athletes (particularly soccer players)!
SCHEDULING PERFORMANCE TESTS
Generally, our testing schedule depends on our athletes’ seasons, but is essentially the same across sports.
It truly depends on how much control you have over timing, programming/periodization/access to team, etc. This is just what I found to be most efficient, effective, and informative.
See our general schedule below:
In the world of Women’s Soccer/Football, as well as Baseball, Women’s Handball, & American Football in Germany, I’ve worked hard to maximize every penny I get to develop and adapt White Lion’s PTBs!
PERFORMANCE TESTING SCHEDULE (PTS):
Test: Start Off-Season (post-break)
Retest 1: End Off-Season/Start Pre-Season
Retest 2: End Pre-Season/Start In-Season
Retest 3: Middle In-Season/Mid-Season Break (optional)
Additionally, I find no reason to test at End In-Season; because I track weekly metric like Fatigue, Pain, Soreness, Sleep, and Stress (etc.) for individual athletes in-season, I have a general feel for their performance level. And, for the most part, End In-Season is when athletes are at their weakest, most tired, and most injury-prone. I prefer to wait a week or two to let them regenerate before testing for a baseline level again (Start Off-Season).
TEST SELECTION & USE
Unlike our PTS, our selection of movements tested DOES depend on the sport. However, across the board, I break our test battery down into four categories: Movement, Power, Strength, and Endurance Testing.
I’ve listed the battery we use for soccer players below and a few considerations for other sports.
PERFORMANCE TESTING BATTERY - SOCCER (PTB-S):
Movement Testing: Toe-Touch, Hip IR/ER, Single-Leg Jump/Landing, FMS Push-Up Test
Power Testing: Vertical Jump, 10m Sprint, 30m Sprint, 3-Hop Test (3 Trials each)
Strength Testing: Deadlift 1RM, Max Pullups, Max Bulgarian Split Squat (reps/leg with set weight)
Endurance Testing: 300-meter OR 2-mile Test (2 trials)/Beep Test (often done by head coaches)
This test battery, for best performance, should be done across two days of 1-2hr sessions each. It can, however, be done in one day (usually 3 hours, as fatigue is relatively high). Fatigue should be taken into consideration and adequate rest periods and warmups added in.
When time allows, especially for soccer and football players where foot strength and joint mechanics are vitally important, I add in a gait analysis.
Everybody hates a Beep Test!
If time is especially short, I pull out the 10m Sprint, BSS test, and sometimes the endurance test. But, if this is done for a club or team and if it is specifically and strictly “a performance test” instead of a diagnostic session, we drop the Movement Testing (more on that below).
For baseball and football testing, we swap out the Vertical and 3-Hop Test for a basic, single Broad Jump Test. Additionally, we use change the sprint start position depending on the sport, and usually leave out the 10m Sprint for baseball and 30m Sprint for football due to sport-specific demands.
What is important to consider while choosing your tests or movements? Ask yourself:
1) What do my athletes need for their sport?
2) What do I want to learn from this?
3) What do I want to/should I know in order to help my athletes meet sport demands?
4) What time do I have and what resources do I have access to during the testing?
As with any program, you can adjust your exercise/movement selection from there! Don’t plan to do a 30m Sprint test when you don’t have 30 consecutive flat meters to run or a stopwatch to test with.
CONSIDERATIONS FOR TEST APPLICATION
VERTICAL JUMP TEST
Again, tests will always depends on your resources and preferences. If you don’t have a force plate, G-Flight sensors, or that cool LeBron James-esque Vertec Pole that you flick with your fingers, these are the two options I find most efficient and accurate.

Option #1: Chalk Test (my preference)
VJ Marker using Option 1.
In the Chalk Test, the athlete chalks his or her hands and stands next to a wall. S/he then extends the arm against the wall above his/her head. Mark the height of the middle finger on the wall with chalk, a marker, or tape. This is your Baseline Marker.
Baseline Marker using Option 1.
Then, again next to the wall, allow the athlete to set up for the vertical jump. Upon take-off, s/he is to extend the arm and brush his/her fingertips against the wall as high as possible. This is your VJ Marker.
After each attempt - we use 3 trials - measure the distance between the Baseline Marker and the VJ Marker with a measuring stick or tape. This is your VJ Attempt (#1/#2/….).
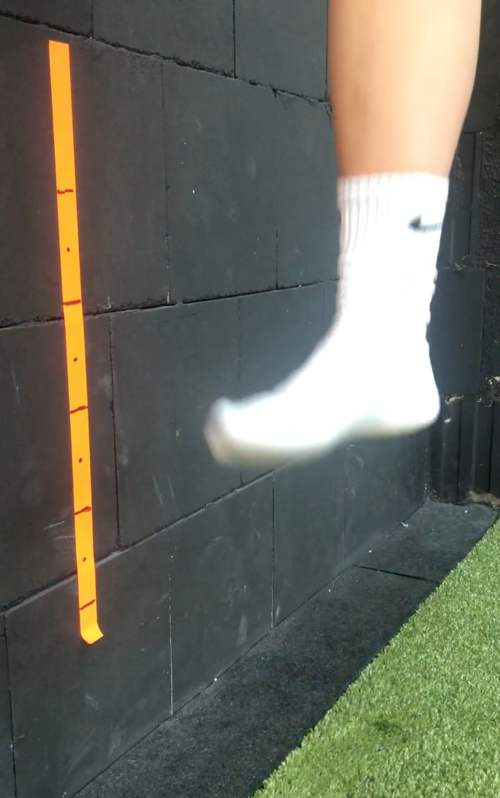
Option #2: Tape Test
Although I generally avoid this option - it requires more set-up and equipment and is a bit less accurate - it is useful!
Place a long strip of tape against a wall, from the ground up. Using a measuring tape or stick, mark the measurements as appropriate (I usually mark the Feet or Meters and then the .5s of each).
Have the athlete stand close to the wall, heels in line with the tape.

Using a video camera or phone, set up your video so that the athlete’s feet and the tape are in view. Whether you prefer to do this from straight ahead (facing or behind the athlete) or from the side (facing the wall with the athlete facing one direction) is up to you; both can be useful, but it is NOT accurate down to the millimetre.
VJ Attempt using Option 2.
After the athlete has completed the jump, play back the video and make note of how high the athlete jumped according to heel hight as shown on the tape. This is your VJ Attempt (#1/#2/…).
MOVEMENT TESTING
I am regularly asked why I include Movement Testing in a normal performance test, rather than sticking to a typical performance-based test battery.
To me, knowing how an athlete moves and making purposeful note of their biomechanical strengths/weaknesses is important for player health, especially if you are responsible for their programming. You need to have a good idea of each players’ movement ability and limitations so that you can plan and program for a “middle-ground” in your workouts.
If some athletes can’t get into the Hinge position, you probably won’t program Kettlebell Swings in their first workout (where they are required to generate power repeatedly out of the hinge position). I’d rather have a general idea of how everyone moves so that I can plan and progress them accordingly.
Yes… even in a team. You’re still working on averages!
ENDURANCE & SKILL TESTING
In my experience, Endurance & Skill Tests are often carried out on the pitch with head coaches. However, these are sport- and situation-specific. Thus, we exclude them outside of the 300m or 2mi Tests, from our standard testing batteries. I’m not into Beep/Yo-Yo Testing, 5-10-5 Testing, SPARQ Testing, or Skill-Specific Speed/Accuracy Testing unless it is specifically asked for!
(As an S&C Coach who isn’t often required to run on-field sport-specific workouts, I don’t test them automatically. However, I make sure to be UTD on the standards so we can do them if needed!)
——————
Test-Retest is a theme in the research and performance communities for a reason; if you’re going to provide an intervention and hope an athlete improves, you need to know what needs improvement first (baseline) and if it improved from the intervention (results).
Otherwise, you’re just guessing and hoping. Unfortunately, in a sports world that is advancing toward high-performance training and technology so rapidly it’s hard to keep up, you’ll run out of luck with that approach sooner rather than later!
Maximizing a limited budget, although irritating and difficult, can pay off in leaps and bounds, though. I hope this helped you explore where and what you can measure or test without breaking the bank!
At the end of the day, when trying to test, ask yourself why you need to, what you need to know, and what you hope to gain from it. That will help you get to the bottom of what, when, and how to measure your athletes’ performance for maximum gains.